

Door-to-Door Canvassing
Setting Up Your First Canvass
This guide walks through how to create and configure a door-to-door canvass in Vottiv.
This process is completed from the Vottiv website and should be done before canvassers arrive.
Note: Onboarding canvassers is covered in a separate guide.
Step 1: Navigate to the Canvassing Section
Log in to your Vottiv account and go to your account home.
You can access canvassing in either of the following ways:
Click Door-to-Door Canvassing, or
Go to Contacts and select Canvassing
Both options take you to the same canvassing dashboard.
Step 2: Review the Canvassing Dashboard
From the canvassing dashboard, you can:
View active canvasses
Access archived canvasses
Review requests submitted by canvassers (such as voter requests)
View canvasser activity
Export canvass data — a spreadsheet of the doors your team has already worked
Looking for a printed list your volunteers can carry to the door? The canvass data export will not do that. It only includes doors that already have a result. To build paper packets from your routes, see Printed Walk Lists: Paper Packets Built by Vottiv in this category.
To create a new canvass, click Create canvass in the top-right corner.
Step 3: Select a Group to Canvass
You’ll be prompted to choose the group you want to canvass.
Select an existing group, or
Create a new group if one does not already exist
Once selected, click Create canvass.
Step 4: Name the Canvass
Enter a name for your canvass.
This name will be visible internally and to canvassers.
Step 5: Choose the Purpose of the Canvass
Next, select what canvassers will be able to do at the door. You can enable one or more of the following options:
Determine support
Add tags to voters
Collect signatures
Register voters
Survey voters
Create a new survey or link an existing survey
Distribute information (such as door hangers)
Verify or update voter information
Add a custom link
For example, directing voters to a specific website with a custom button label
For this walkthrough, the example selects Determine support.
Once selected, click Next.
Step 6: (Optional) Set Up Canvass Triggers
Canvass triggers automatically send a text message to a voter when a canvasser records a result at their door — no manual follow-up needed.
You can attach a trigger to outcomes such as:
A voter is marked as a supporter, undecided, or opposed (with the Determine support purpose)
A household is canvassed, not home, or inaccessible
Information is left at the door (with the Distribute information purpose)
A tag is applied to a voter, or a yard sign is requested
For each trigger, you choose the timing — send immediately or after a delay (e.g., two weeks before Election Day) — and, for household outcomes, who receives the text: everyone at the household, the oldest voter only, or only voters who match your group. Messages can be personalized with the voter’s name and can include an image.
Triggers are optional. You can skip this step and continue without setting any — you can also add or edit triggers later by editing the canvass. For message rules, quiet hours, and how to monitor sends, see Canvass Triggers: Automatic Text Follow-Ups After the Door in this category.
Click Next to continue.
Step 7: Add Instructions for Canvassers
You can include instructions that canvassers will see when they begin the canvass.
Examples:
Be polite
Don’t forget to smile
Introduce yourself
These instructions help set expectations and provide guidance in the field.
Once complete, click Next.
Step 8: Configure Route Strategy
Choose how you want to divide your voter list into walkable routes. Automatic routes are now available as Neighborhood-based or Hex grid routes. Precinct Routes and Manual Routes are still available.
Option 1: Neighborhood-based Routes (Beta)
Neighborhood-based is the default automatic route method. It tries to create route boundaries that follow neighborhood and street-style patterns, so the map may feel more natural for field teams. Because it follows those boundaries, the number of households in each route may vary more than with Hex grid routes.
Use Neighborhood-based Routes when:
You want routes that feel closer to natural neighborhoods or street sections
You are comfortable with some variation in route household counts
You want to use Vottiv’s default automatic route method
Option 2: Hex Grid Routes
Hex grid is the other automatic route method. It keeps route household counts more even, but the route boundaries may not follow neighborhoods, streets, or other familiar local boundaries.
Use Hex Grid Routes when:
Even route size is more important than neighborhood-style boundaries
You are planning staffing around similar household counts per route
You prefer a predictable automatic split of the canvass area
Route Workload Options
For automatic route methods, choose the approximate number of households you want in each route:
Tiny: 100 households per route
Compact: 200 households per route
Standard: 500 households per route
Extended: 1,000 households per route
Tiny is only available for groups with fewer than 10,000 households. For groups with 10,000 or more households, choose Compact, Standard, or Extended.
Option 3: Precinct Routes
This option groups all voters by their precinct name, creating one route per precinct regardless of size. Address markers appear on the map without boundary lines.
Use Precinct Routes when:
Your team is organized by precinct
You need to match existing precinct captain assignments
Reporting by precinct is important
Note: The route workload selector is hidden for Precinct Routes because precinct boundaries determine the route size.
Option 4: Manual Routes
This option allows you to draw your own custom canvass routes directly on a full-screen map. This gives you complete control over how your canvassing territories are organized.
Use Manual Routes when:
You have specific geographic boundaries in mind
You want to carve out specific neighborhoods for specific volunteers
You need to ensure routes do not overlap in complex areas
Select your preferred option and click Next.
Step 9: Create the Canvass
Click Create canvass to proceed.
If you selected Neighborhood-based, Hex grid, or Precinct routes, your canvass is now ready.
If you selected Manual Routes, you will be taken to a full-screen map to draw your routes (see below).
Drawing Manual Routes
If you selected the Manual Routes option, follow these steps to define your territories:
On the full-screen map, click Draw New Route.
Click on the map to create boundary points. Click your starting point again to close the shape.
Give your route a name and click Create Route.
Repeat this process for as many routes as you need.
Click Done Drawing Routes when finished.
Key Features:
Real-time household count: See exactly how many households are in your drawn area as you draw.
Overlap prevention: The system will warn you if a new route intersects with an existing one.
Visual feedback: Households already assigned to routes appear faded.
Route limits: Routes must contain between 1 and 10,000 households.
Step 10: Add Canvassers to Your Canvass
Once your canvass has been created, the next step is adding canvassers so they can begin knocking doors.
There are two ways to add canvassers:
Option 1: Invite Directly from the Canvass
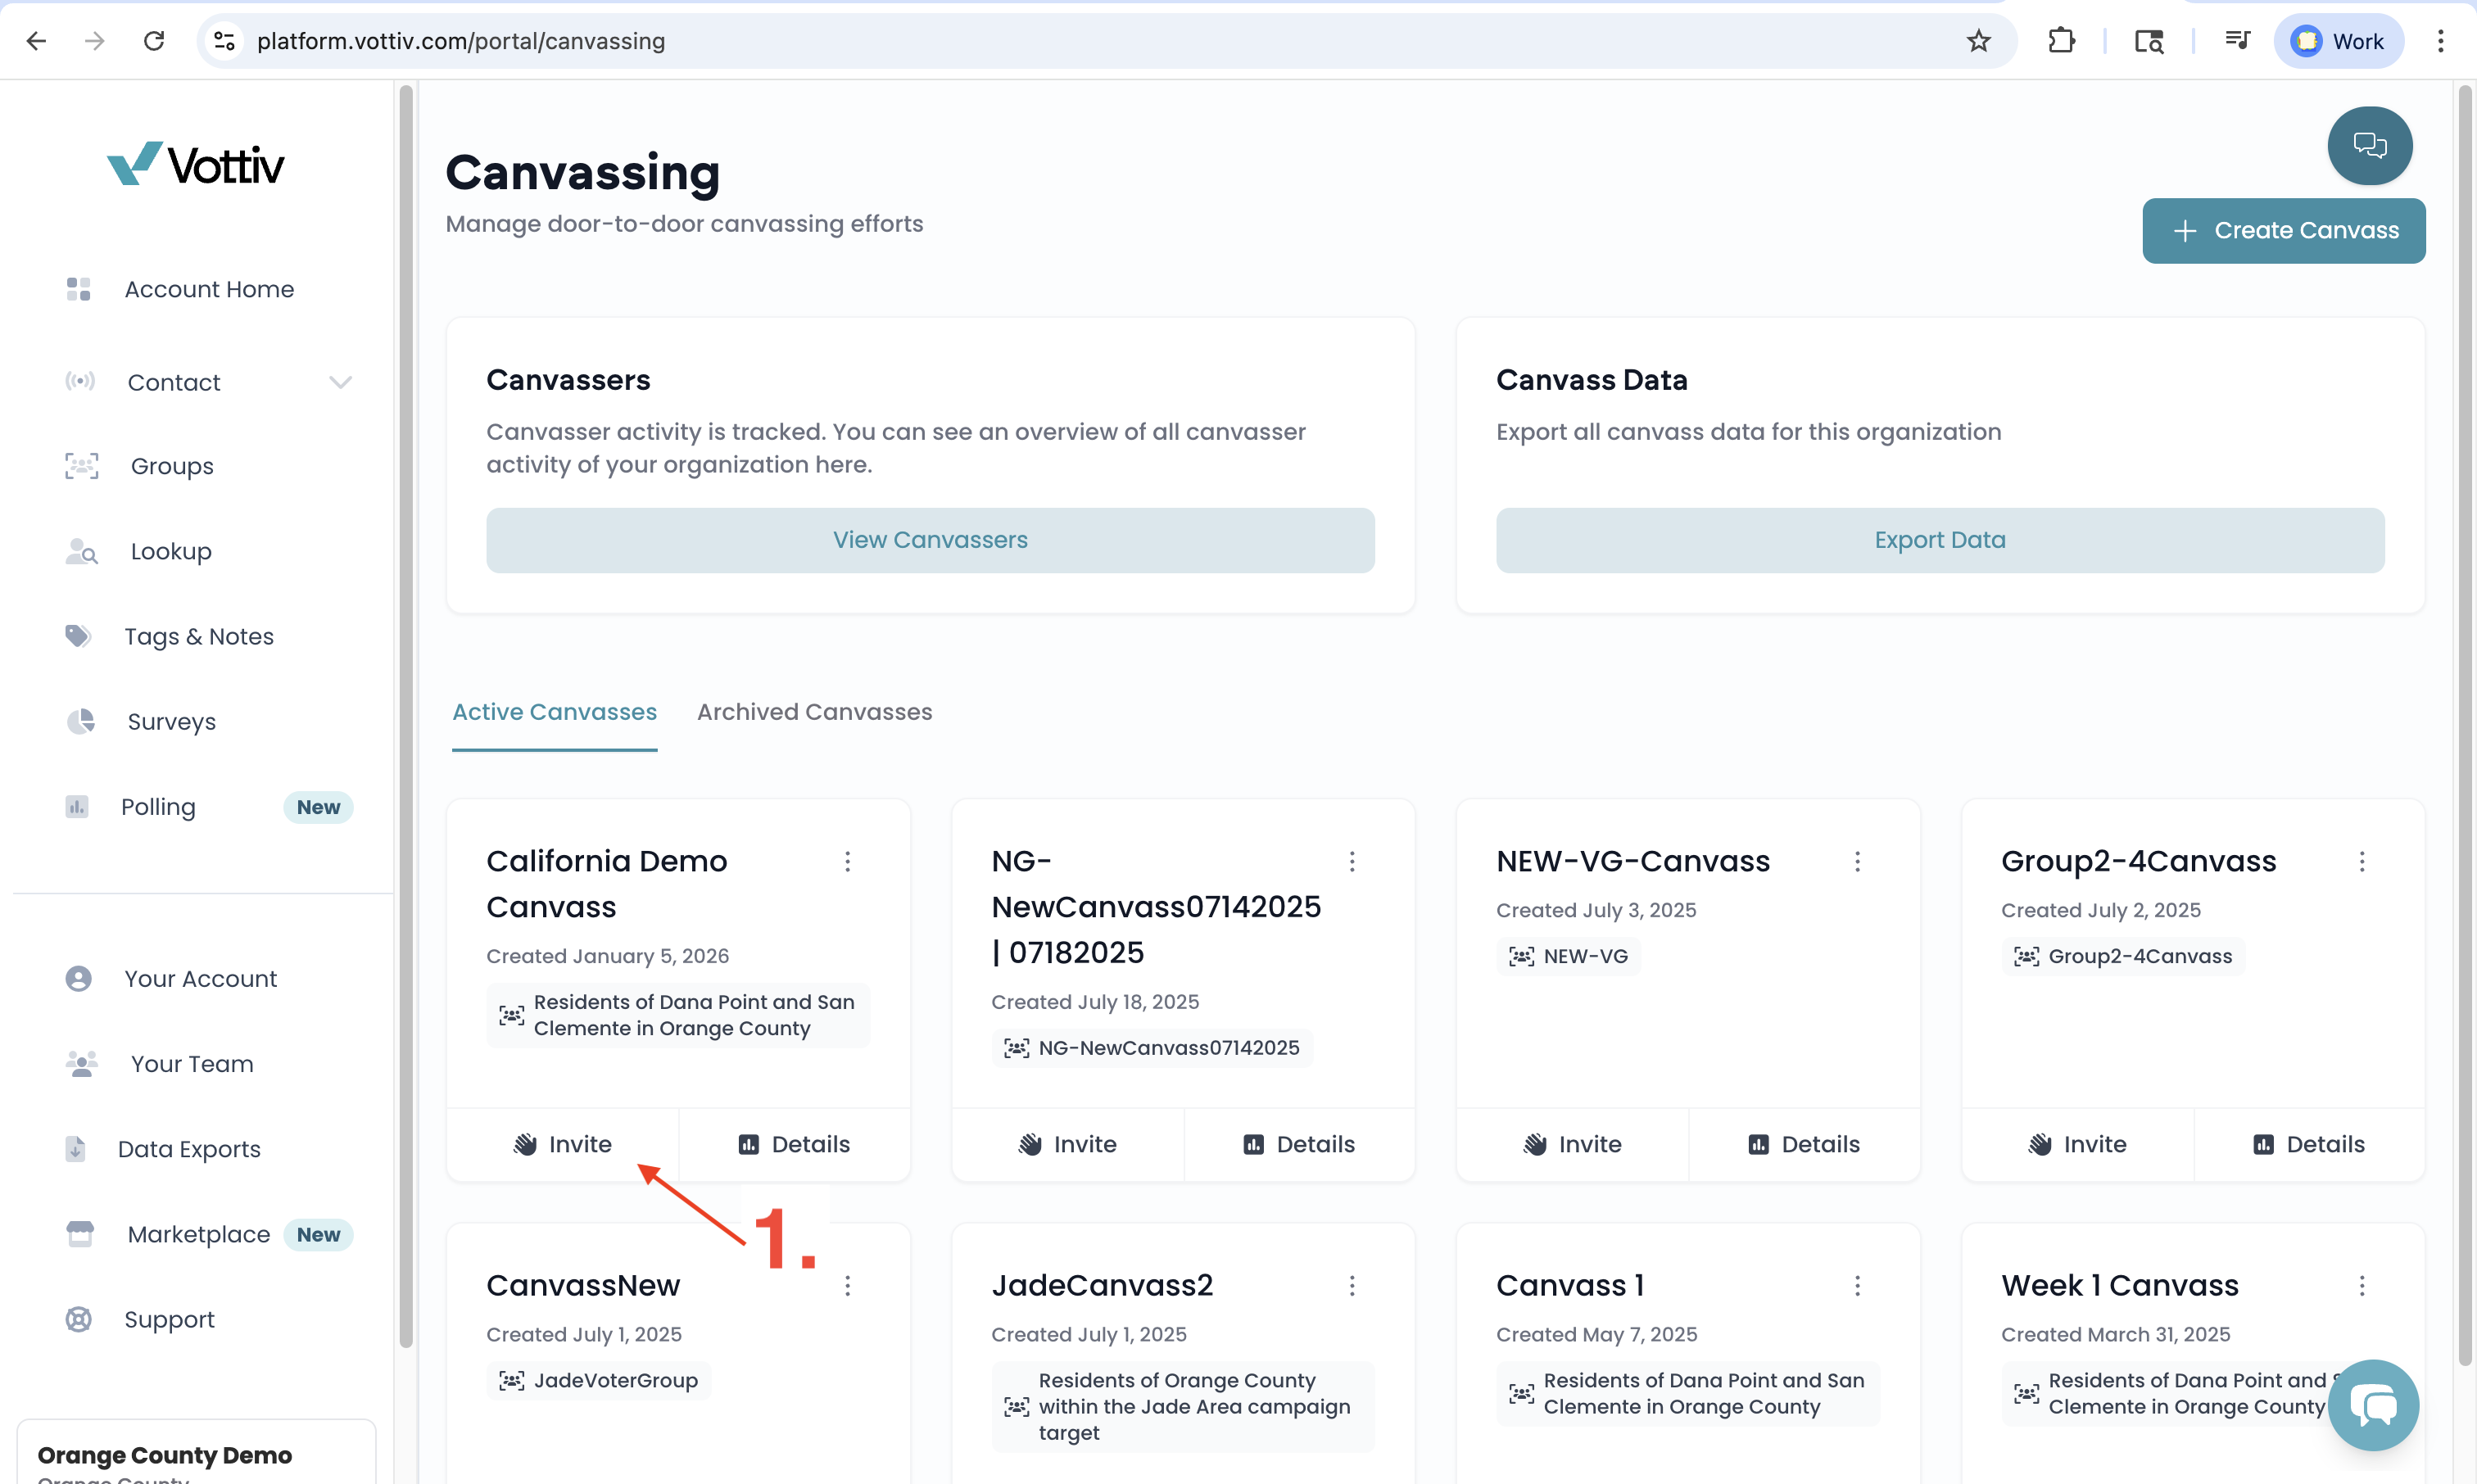
Once you've navigated to the canvassing page, you can:
Click Invite on the canvass you created.
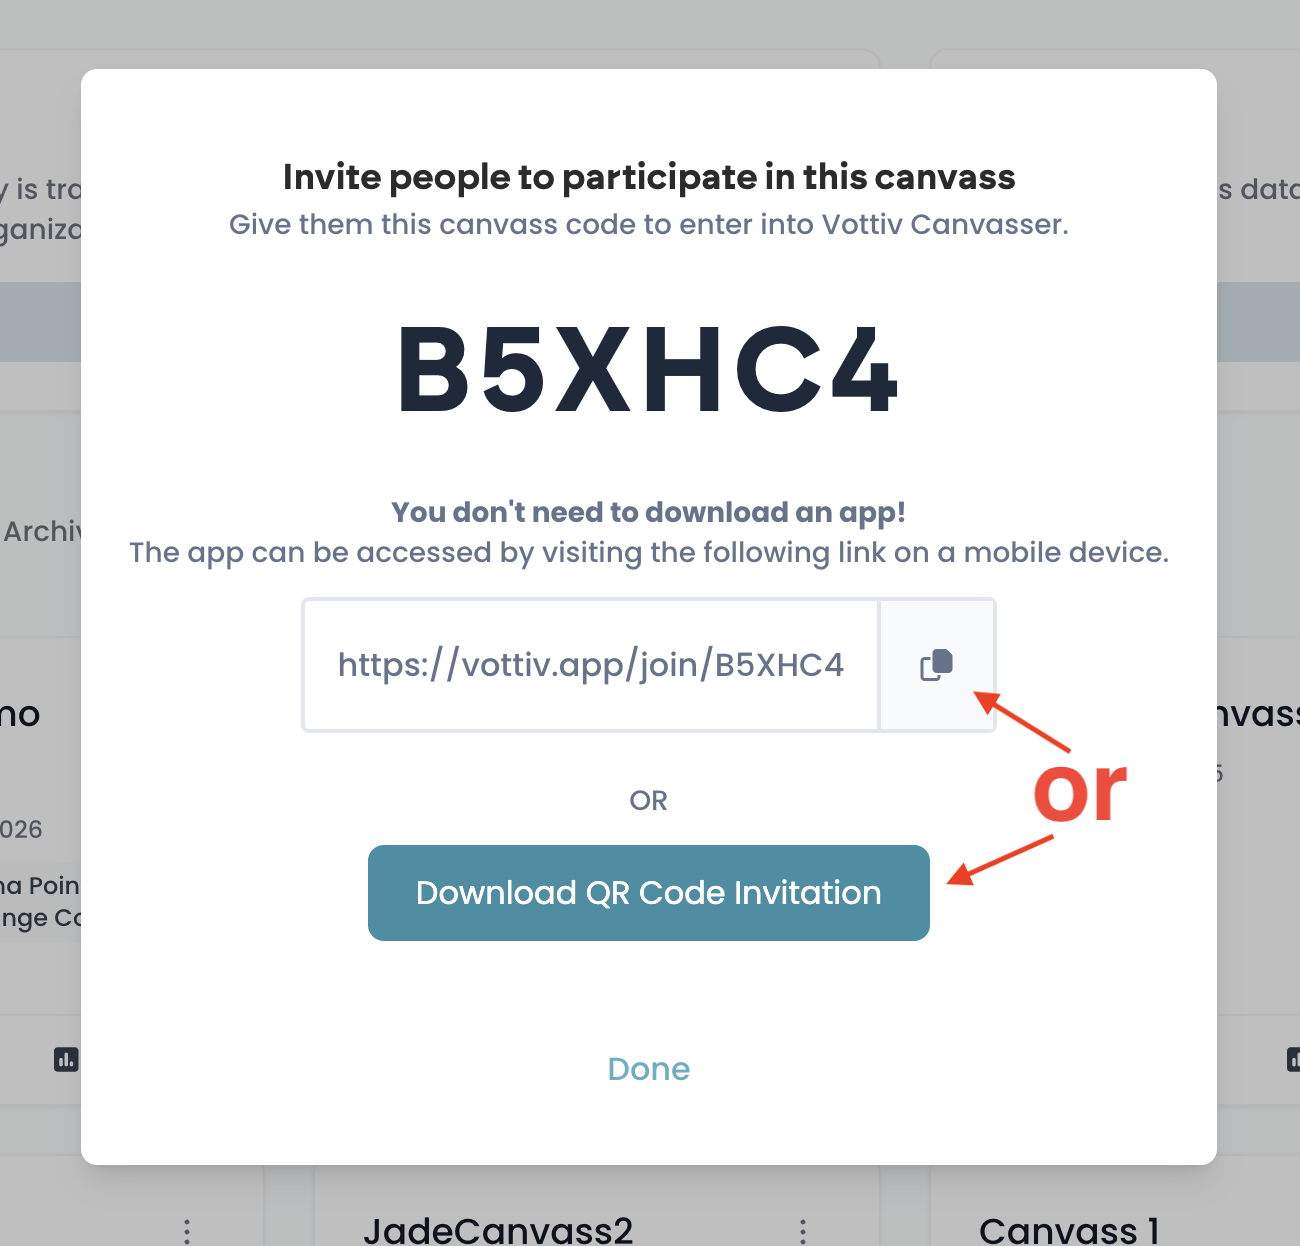
A pop-up window will appear.
From this window, you can:
Copy the invitation link and send it directly to your canvassers, or
Download the QR code for canvassers to scan in person.
After receiving the link or scanning the QR code, canvassers will:
Add Vottiv Canvasser to their homescreen.
Enter the 6-digit canvass code shown in the Invite pop-up
Once entered, they will be connected to the correct canvass and can begin working their assigned routes.
Option 2: Add Canvassers from Your Team
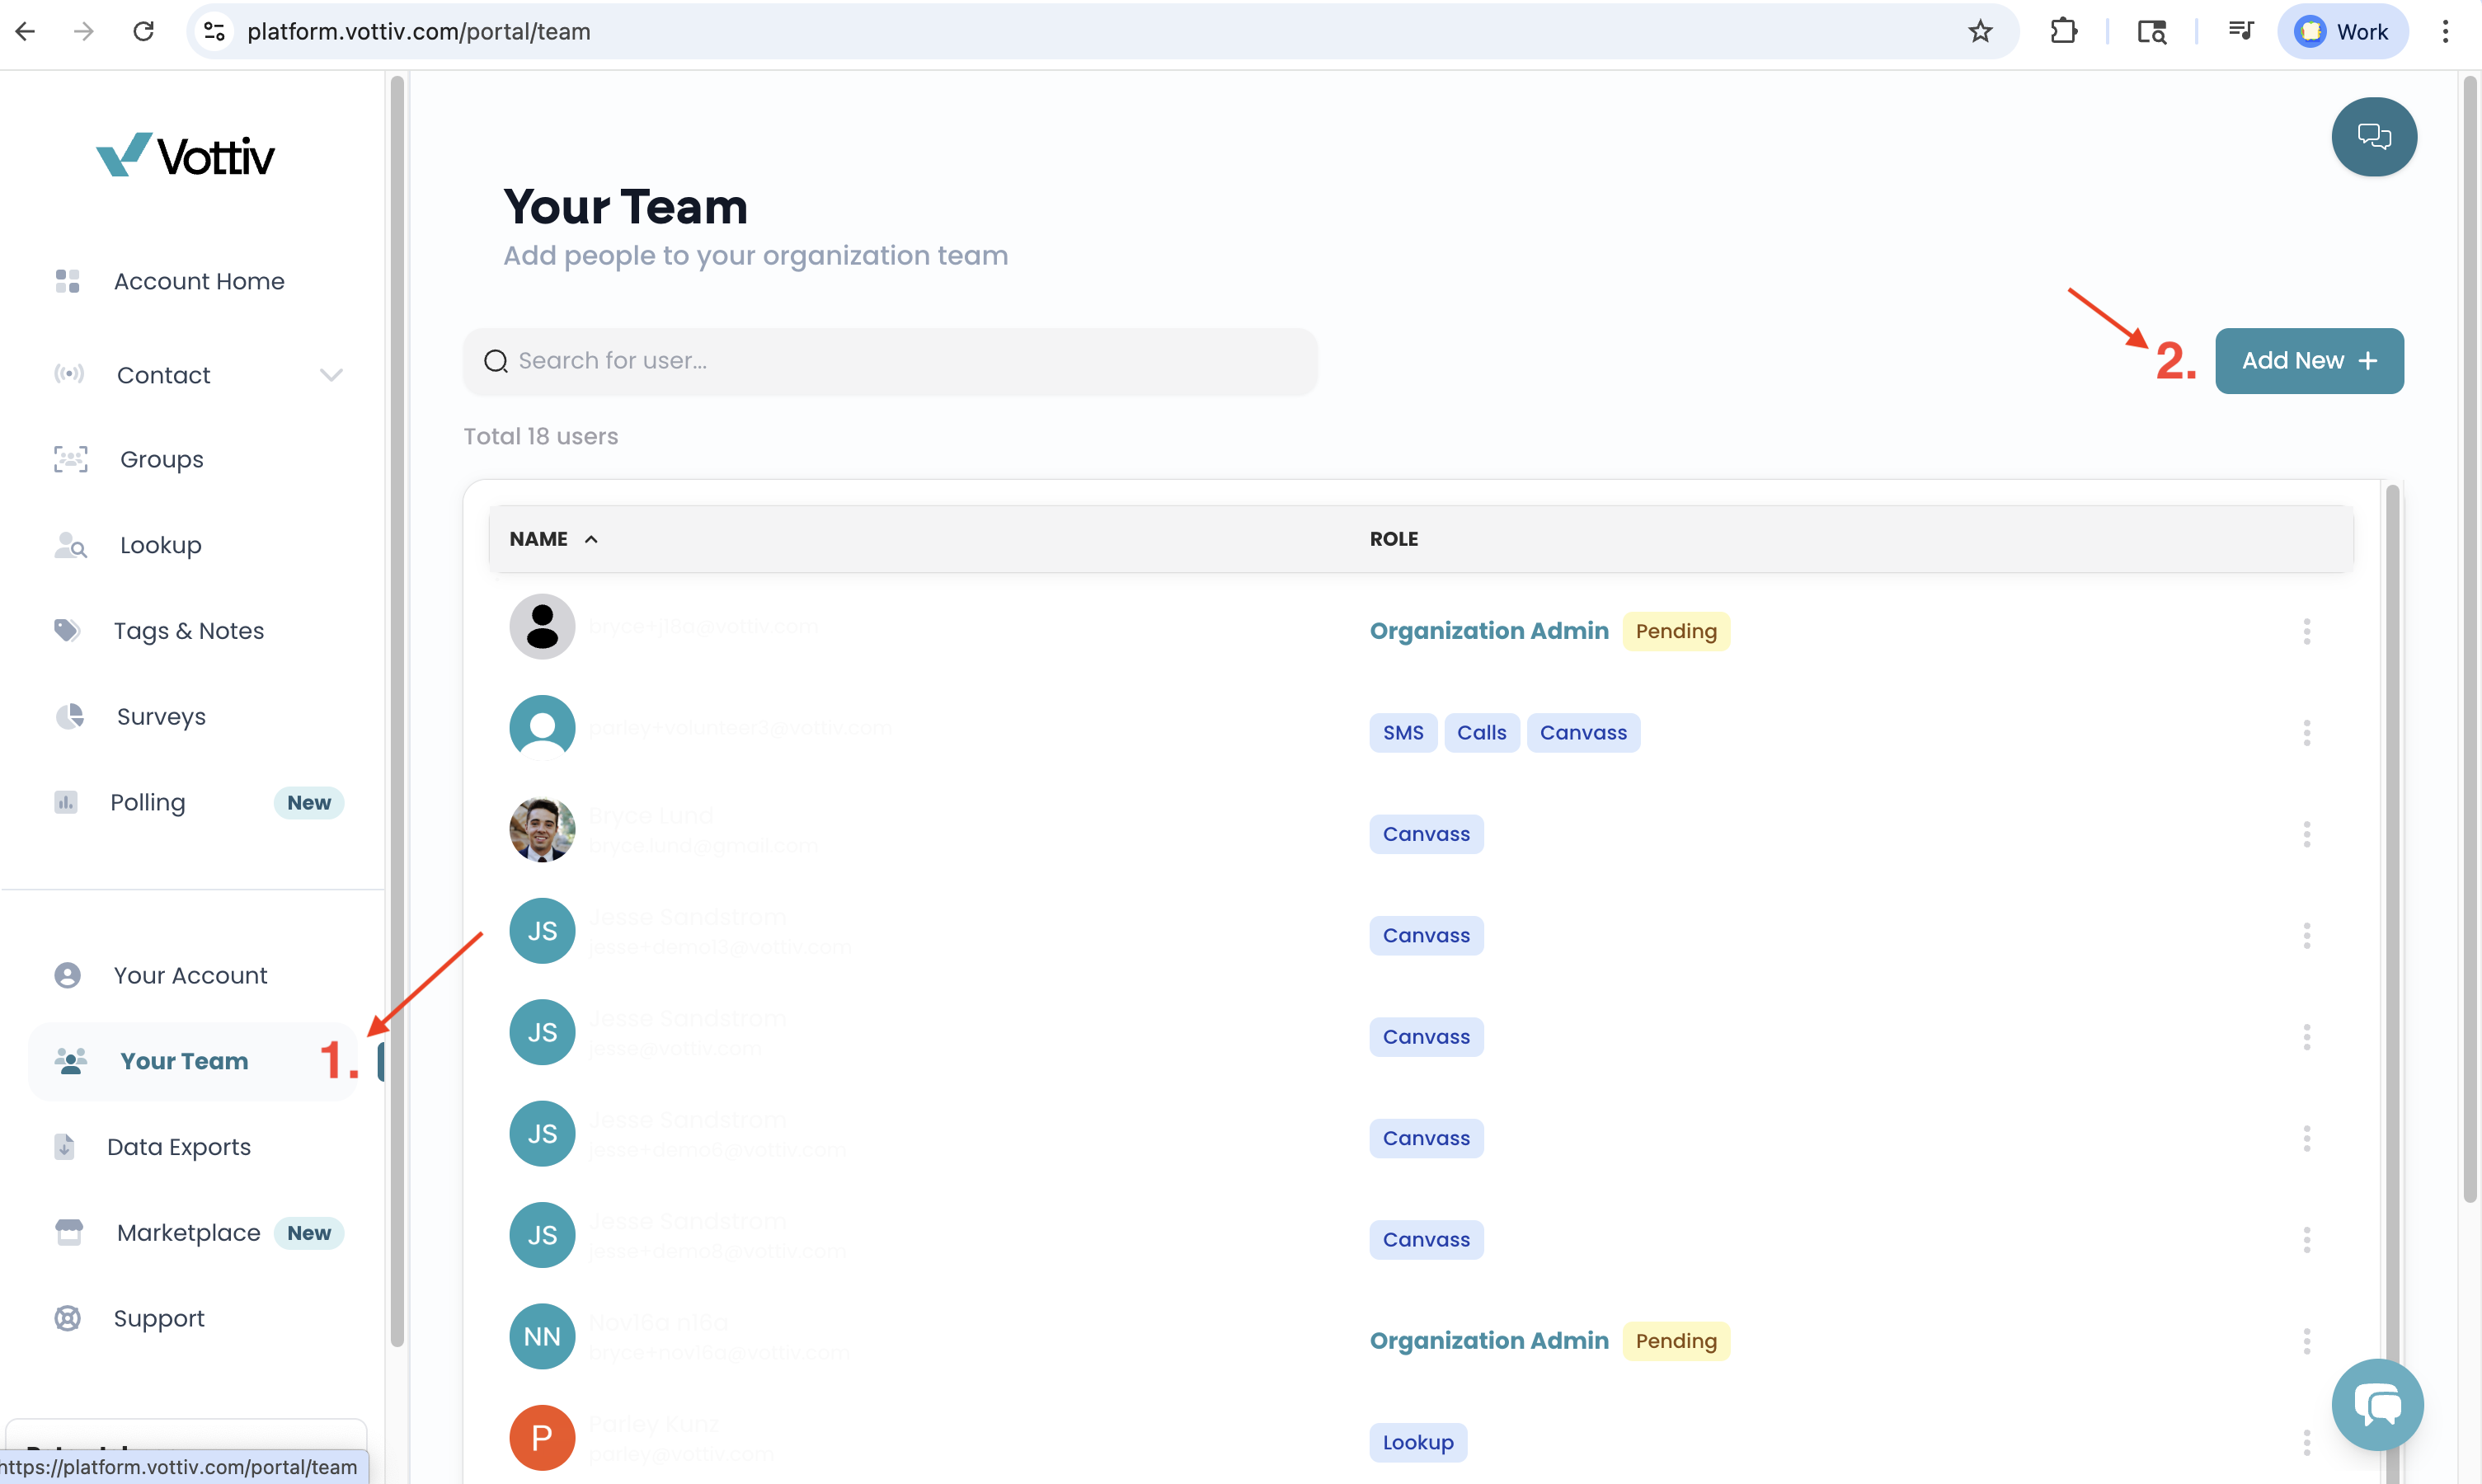
You can also manually add canvassers from your account:
Click Your Team from the left-hand menu.
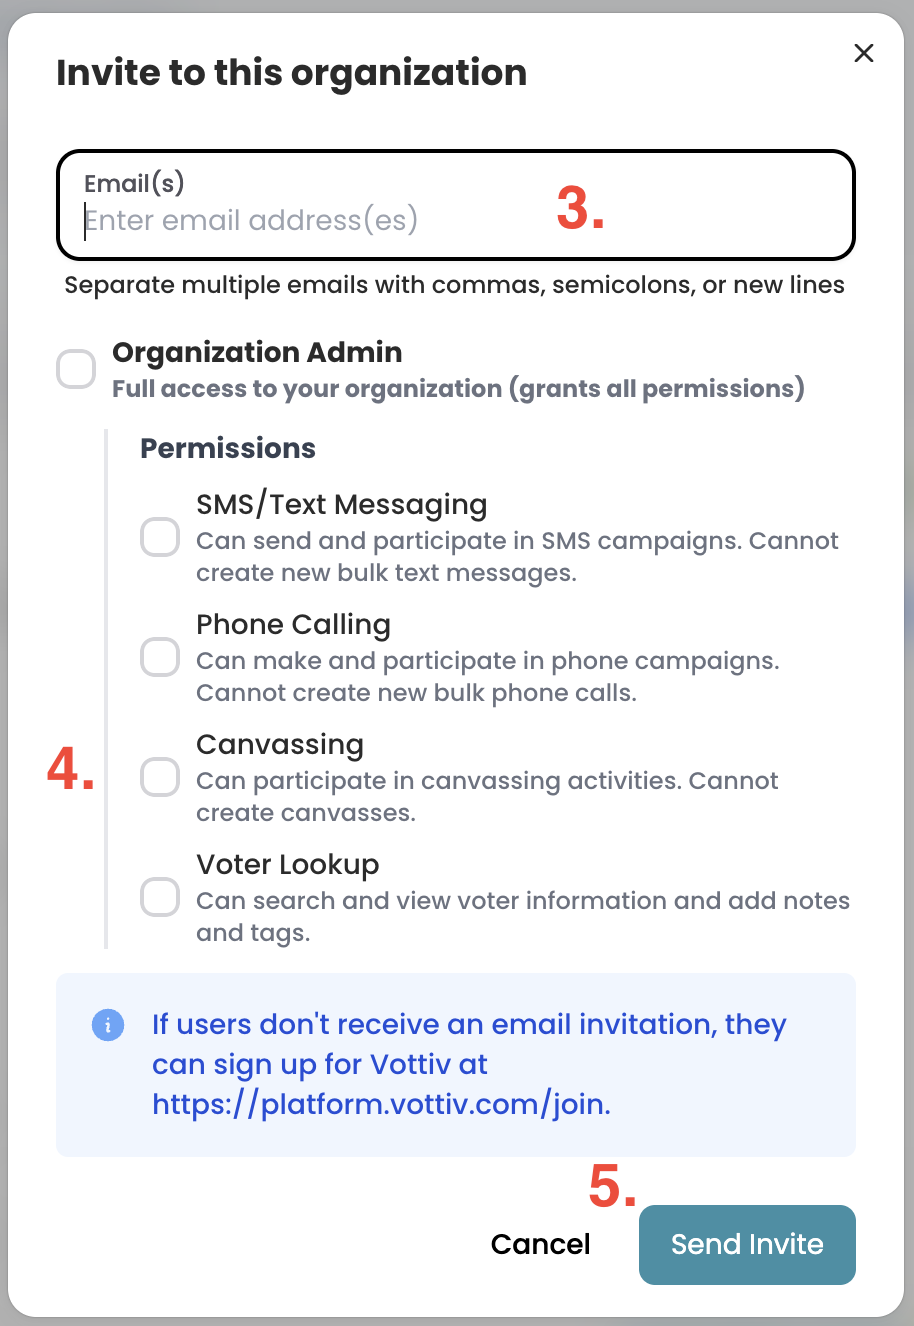
Select Add New.
Enter the canvasser’s email address.
Enable permission to Canvass.
Click Send Invite.
Once added, the canvasser will have access based on the permissions you assigned.
Step 11: Assign Routes to Volunteers
Once your canvass has been created, the next step is adding canvassers so they can begin knocking doors.
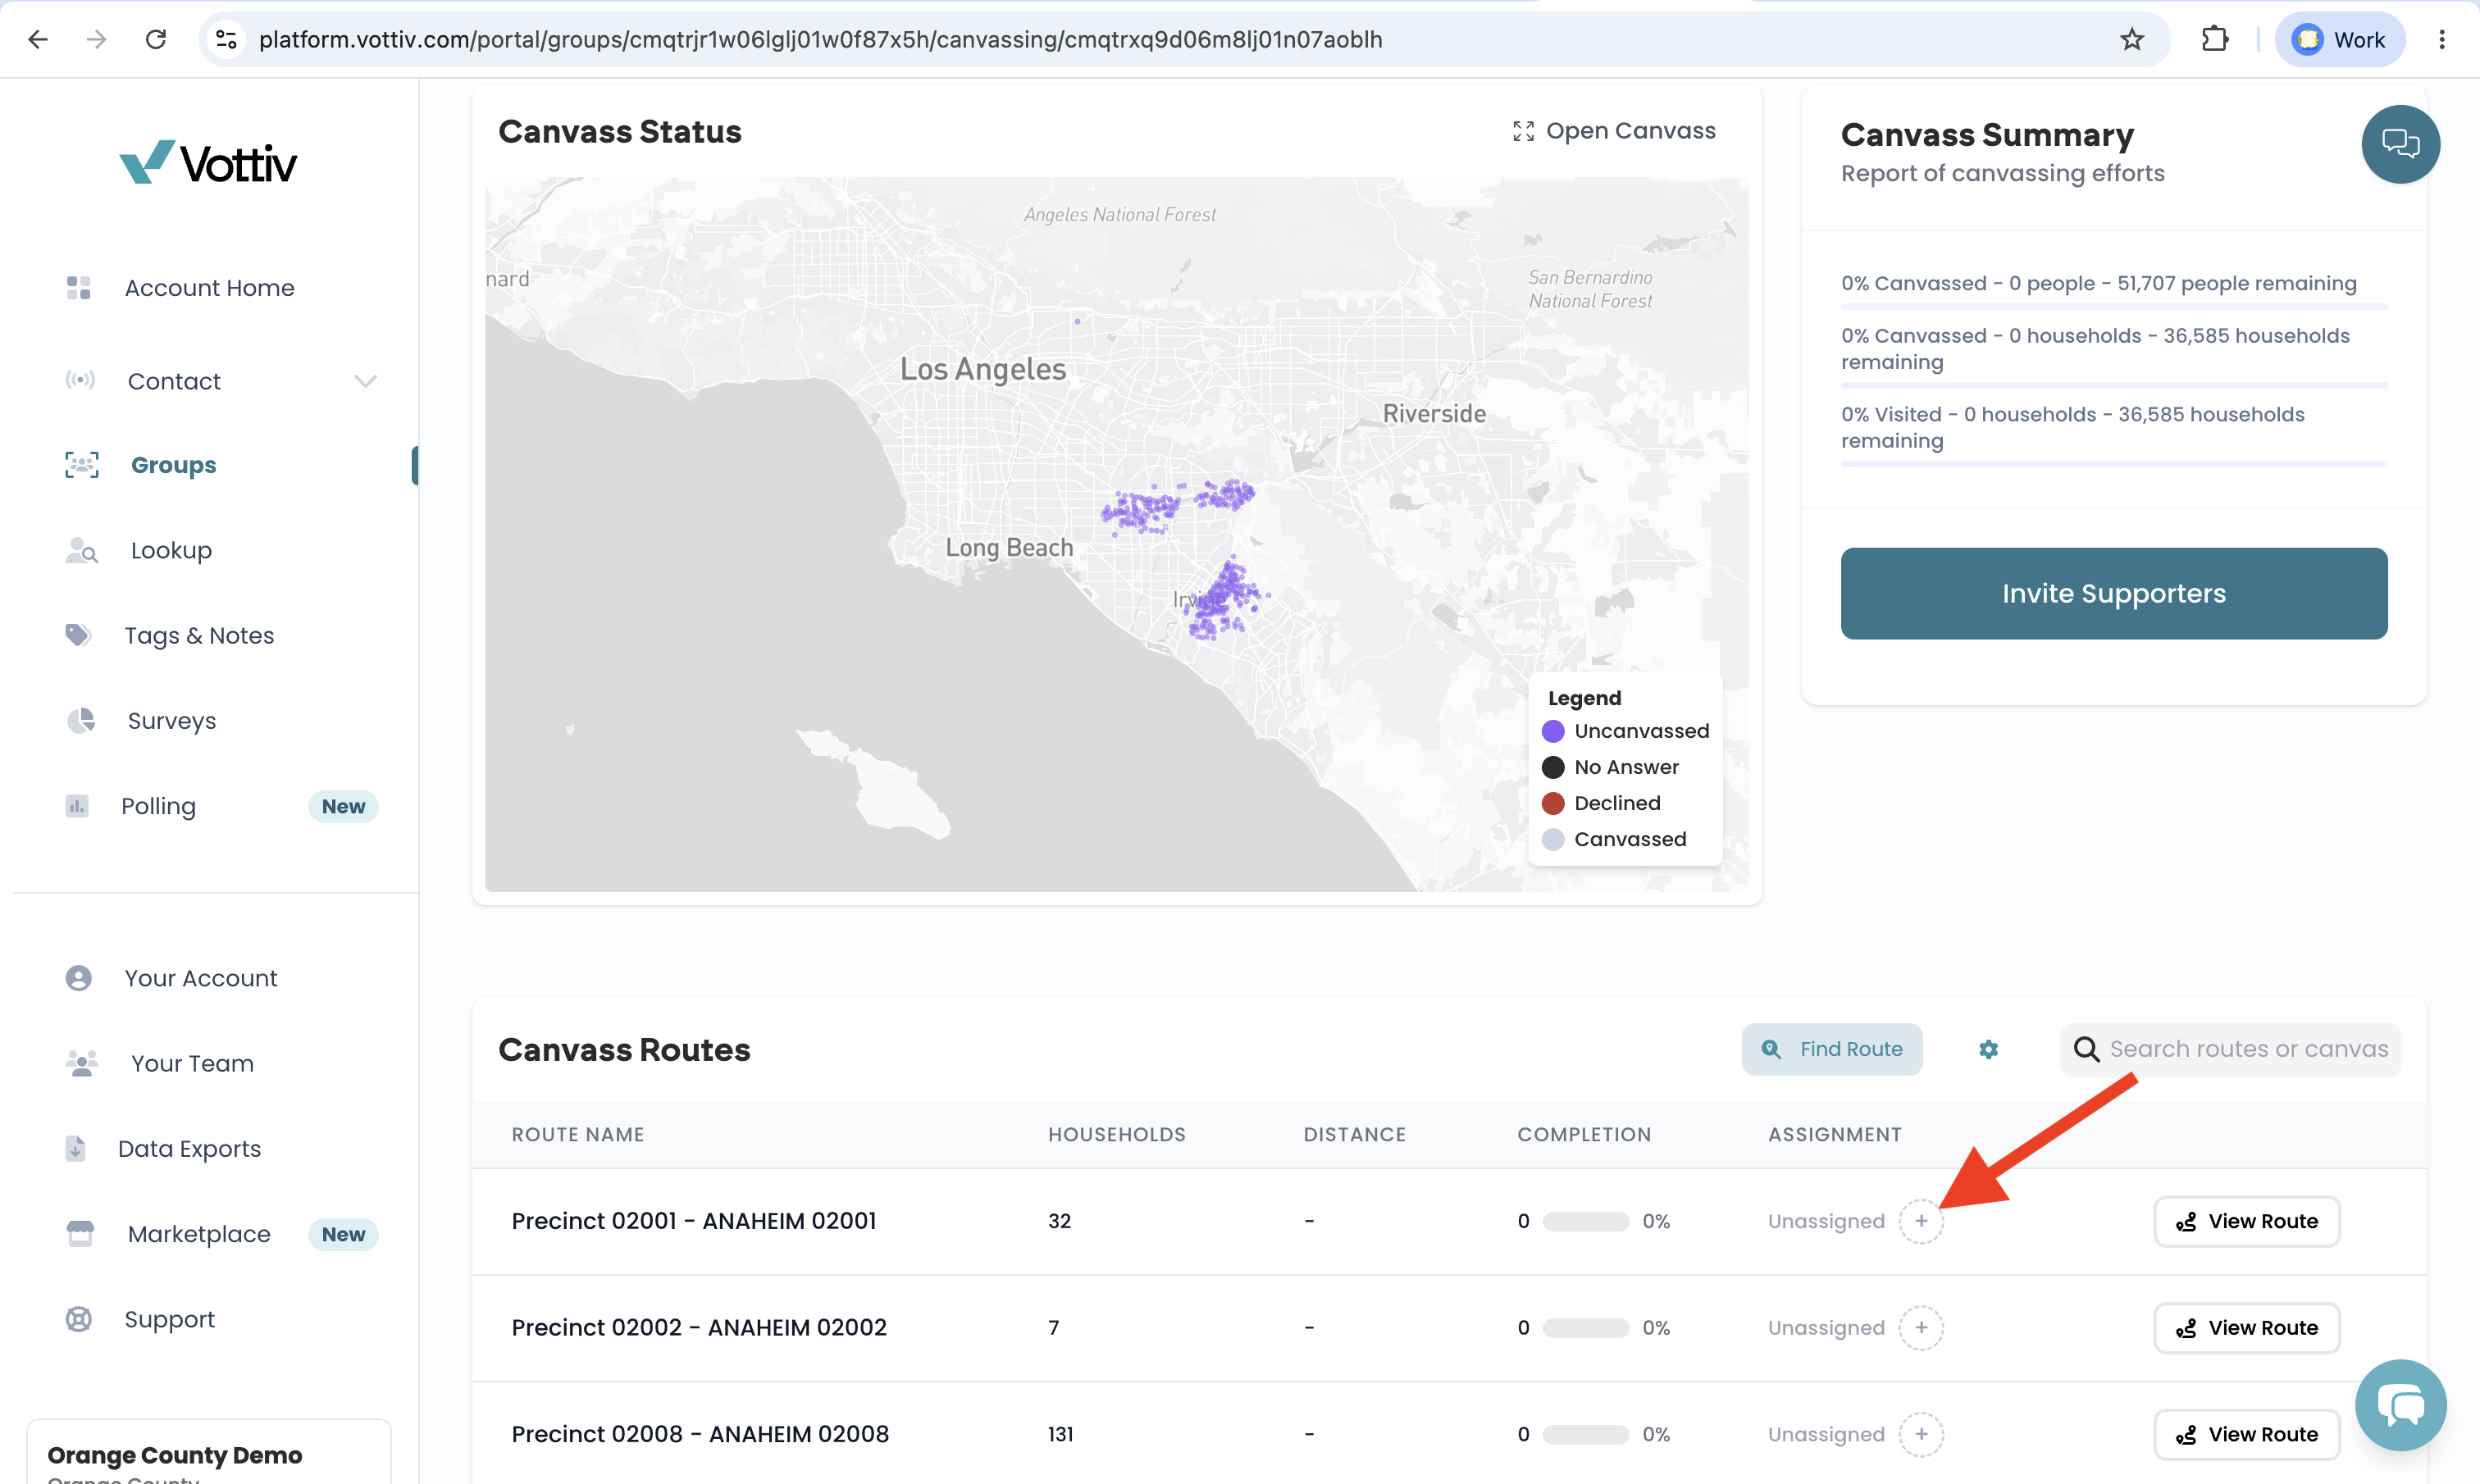
Once your canvass has been created and its routes exist, you can assign specific routes to specific volunteers. This lets you control exactly who knocks which territory.
Note: Route assignment can be done at any point after routes are created — either before or after you invite your volunteers. You do not need to complete inviting everyone first.
To assign a route to a volunteer:
Open the canvass and go to the Assignments section.
On the route you want to assign, click the plus (+) button.
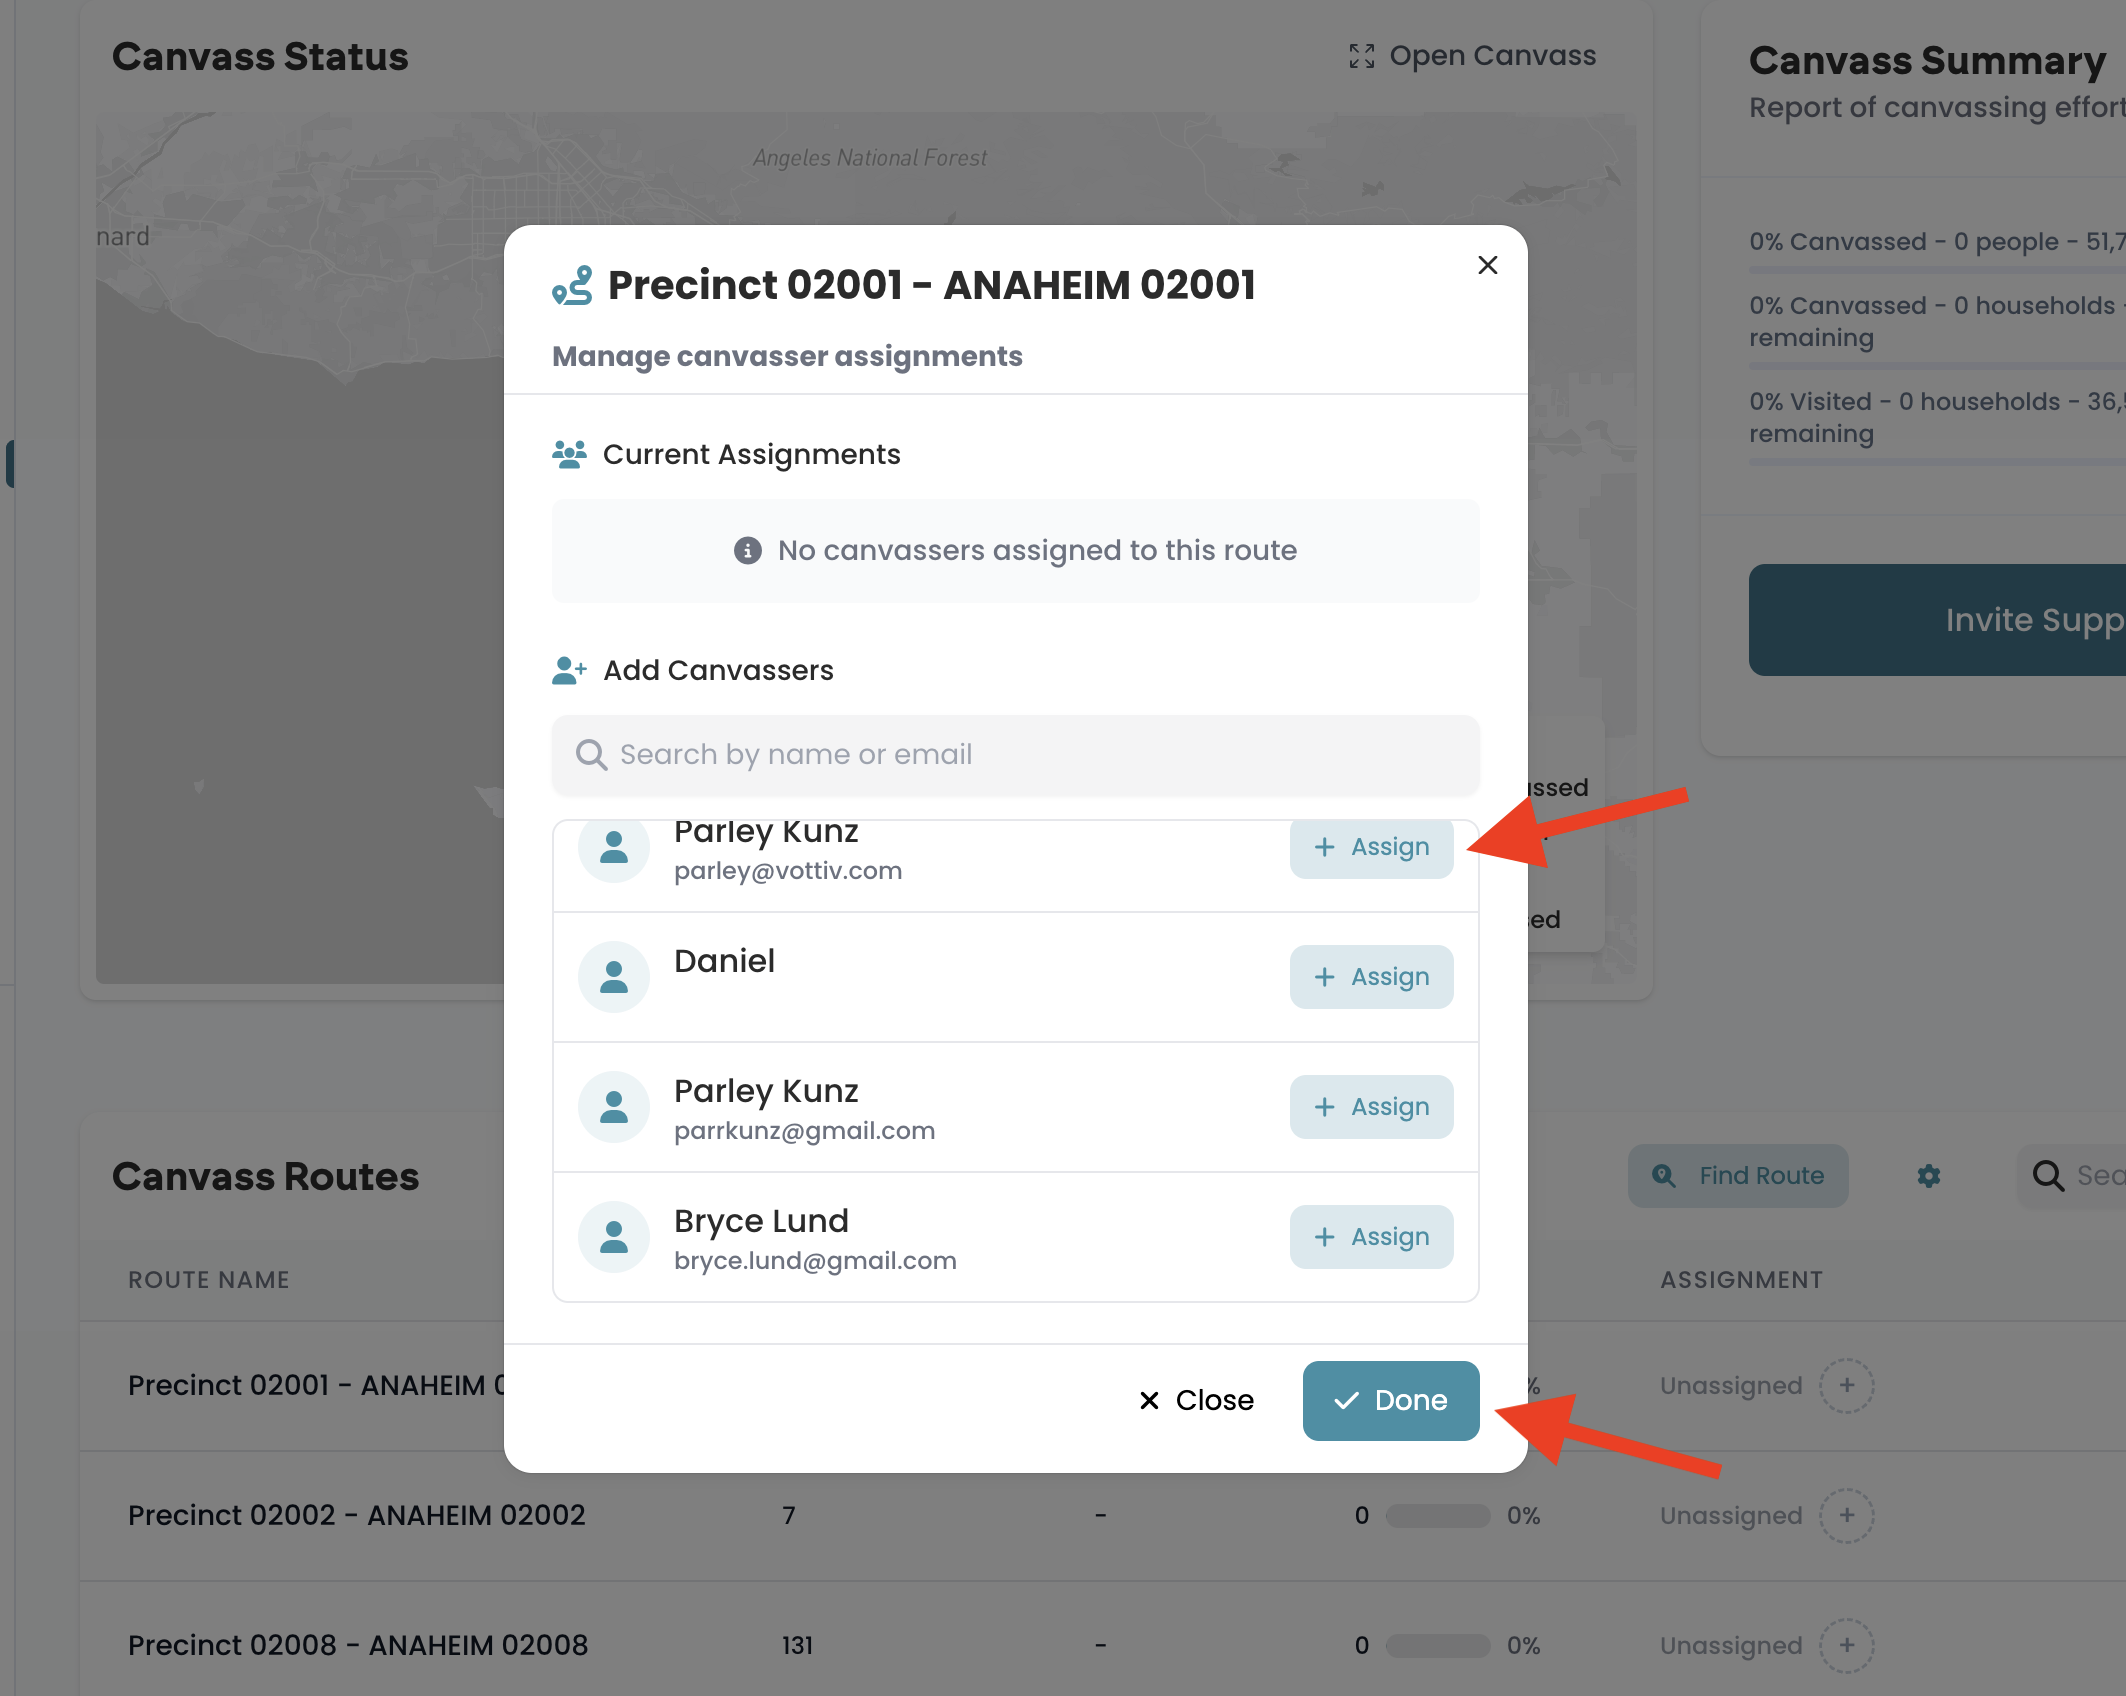
Use the search field to search by volunteer and find the person you want to add.
Select the volunteer to add them to that specific route, then click Assign.
When you've finished assigning, click Done.
You can repeat this process to assign volunteers across as many routes as you need.
Step 12: (Optional) Print Walk Lists
Most teams work straight from the canvasser app, which needs no download and keeps recording when the phone loses signal. If some of your volunteers need paper instead, Vottiv builds printed packets from the routes you just created.
Open the canvass, scroll to the Routes table, and press Print. Each route becomes its own handout with a cover, a route map, and the doors in walking order.
Printed walk lists cost $25 once per canvass, and reprints are free after that. Printing is included with the Voter Contact Package. For the full details, see Printed Walk Lists: Paper Packets Built by Vottiv in this category.
You’re Ready to Launch
With your canvass created and your team added, you’re ready to begin door-to-door outreach.
Was this article helpful?